Friday, May 30, 2008

Hand-Carving Stamps

Strictly speaking, this post isn't about clay, but it involves something you can definitely use with clay-- hand-carved stamps!

Most recent stamps

I once thought carving stamps would be difficult, but it's actually very do-able. (Not to say that I'm now an expert, but I've been able to carve stamps that I'm happy to use.) It's also quite a bit of fun!

Here are a few quick pointers:
  • Invest in the right tools. (This is especially true if you think you'll want to be carving on a regular basis.) As with so many other things, having the correct tools makes stamp-carving much more enjoyable. Some people can carve detailed stamps with nothing more than a craft knife, but most of us have better control with linoleum cutters. (You can also use them to carve cured polymer clay!)
    • Remember: 1) It is recommended that you carve with the sharp end pointed away from you. 2) Go slowly. It's easy to go back and remove more later, but if you carve too much, the damage is done. 3) Most people prefer moving the material that's being carved rather than moving the carving tool. Hold the tool more or less "still" and maneuver the carving block underneath it.
  • Keep the sharp tools away from kids and pets. This probably isn't the best craft for kids. Unless they're old enough to chop vegetables and peel fruit, they probably shouldn't be trusted with linoleum cutters. However, you could always let the kids draw the design, then have an adult carve it for them.
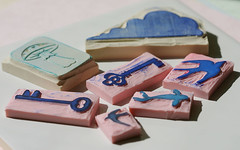
  • Find a quality carving material. There are a variety of products out there made especially for carving-- as well as erasers, which can also be carved-- but they're not all created equal. I've only tried a couple, so far. Speedy-Cut (which is a pale cream/beige) carves very easily, but it is crumbly, which means that your finished stamps will also be prone to crumbling. After you put all that time into making a stamp, you probably want it to last, so it's worth paying a little more for something better. I've just started working with Speedy-Stamp ("the pink stuff"), which has a better reputation than Speedy-Cut. So far, it does seem better. Maybe a tiny bit firmer, but still pretty soft-- and much less crumbly.
  • Set reasonable expectations. As a beginner, it's best if you don't start out with a huge, complicated pattern. Instead, let a simple shape be your first project, then go from there. If you like a slightly "rough-hewn", rustic, even "primitive" style, you'll probably love this craft immediately. If you want detailed stamps with smooth, thin lines, you'll need more patience (and practice).
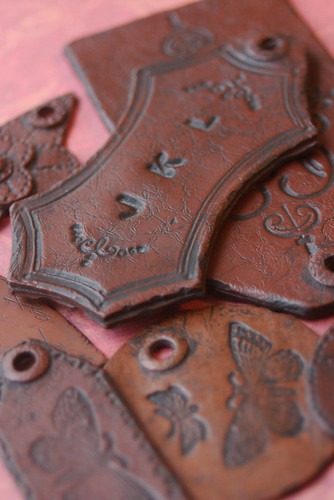
It's a fairly simple process, carving a stamp. It requires more patience than anything else. I'm sure there are plenty of great resources out there, online. Here are just a handful of tutorials to help you get started:
Good luck, and have fun! :o)

Friday, May 23, 2008

Button Bakery

All buttoned up. . . ;o)

Dusky Butterfly Button

Ever since I started experimenting with buttons-- mainly for the benefit of a few family members who were interested in making their own polymer clay buttons to use in quilts-- I've been more or less hooked on buttons.

Glittering Granny Smith

I spend more time thinking about making buttons than jewelry, lately. This is probably partially a "honeymoon period" type thing, but I fully expect to come back to buttons every so often-- just like I do with my other pet projects (mokume gane, mini food, etc.).

Teensy Trio of Baby Buttons

I've even opened a second Etsy shop-- The Mossy Owls Button Bakery-- where I'll be offering some of my buttons and other sewing-related creations. I have no idea what kind of market there is for handmade buttons, and I'm still feeling things out, but it can't hurt to try. :o)

Luscious Teal Pair

If you'd like to see more button-y photos, you can check out the shop (linked above) or the button set on my Flickr. :o)

P.S. I don't know why it is, but Blogger seems to think I'm in a different time zone than I actually am. When I try to publish entries with a time stamp that's several minutes old, it still thinks the entry is "post-dated", and tells me it will publish it later! Pretty annoying, especially since I've checked the time zone setting, and it appears to be right. . .

Thursday, May 22, 2008

Faux Leather Tags

I wanted to make some faux leather bookmarks for gifts, earlier this month, so I played around with a few things and came up with a "recipe" that I liked.

I thought the resultant bookmarks looked and felt like real leather. The recipients thought they were leather-- or at least acted like they did. (Maybe they were trying to give me an ego boost. ;o)) If the faux leather only smelled like the real thing, they'd be perfect. (g)

After making a few bookmarks, I had the idea to make a faux leather tag. I think it was some stamps that I had that got me started thinking about tags. I have some stamps meant to be used with "journaling" or captions in scrapbooks, and they were just the perfect size to be fancy borders for tags.

So I stamped a sheet of the textured clay, put in a few initials, cut out a tag shape, went through the rest of the process-- and I have to admit, I was smitten. I don't think I really need lots of tags around the house, but I'm probably going to be making them anyway. ;o)

(Here are some of the tags I've made so far. That first one's not here. It was a gift, and because I was working right up until the last minute-- shame on me!-- I didn't have time to get a photo before I gave it away. . .)

Faux Leather Tags

I love things that look like they've been around forever, so this is right up my alley!

Here's a link to the project on Polymer Clay Web: Faux Leather Tag

I wrote it for tags, but of course you can adapt it to whatever you'd like-- bookmarks, jewelry components (embossed faux leather cuffs?), boxes, photo frames. . . I think I've even seen someone make a faux leather book cover from polymer clay. (I need to learn how to bind my own books. I once made a book cover out of a butter box, but that's been my limit, so far. (g))

I think the style of the stamps you use might be a key to success with this technique. I may be wrong, but I get the feeling that if the stamp (or whatever you use for texture) looks like something you typically see in real leather, it's more believable. You could use actual leatherworking tools, if you have them.

[Hm. Google "leatherworking" and you get lots of links about World of Warcraft and related things. I know nothing about that game, but there certainly seems to be a huge Internet community devoted to it. Makes sense, I guess. . . given that it's the Internet. ;o)]

Well, enough of that. Now I need to go find an excuse to make some tags. . . (g)

Wednesday, May 07, 2008

Sticky clay!

I had trouble with too-soft clay, today.

The clay started out a bit on the soft side, right out of the package, but the warmer weather is making it even worse. I'm resorting to leaching, which I hardly ever do. I suppose I could try switching to a firmer brand of clay, but I'm stubborn and prefer to buy my clay at sale prices. . . I may have to start refrigerating projects between "steps".

I'm playing around with the faux leather technique, combining instructions from Carol Blackburn's beautiful bead book and Irene Semanchuk Dean's lovely faux surfaces book-- then putting a little of my own twist on things. Nothing anywhere near done, yet. I'm having fun with it, but it'd be nicer if the clay wasn't a goopy mess. :oP Well, I've been leaching away, so I hope to see some improvement.

Monday, May 05, 2008

Crayons in clay!

"Vineyard Pastels" Beads

One of the techniques I've played around with over the past month or two is using crayon shavings as inclusions in translucent polymer clay. It's lots of fun and extremely easy-- a great project to share with kids (though you'll want to chop the crayons for them, if they're very young).

I first read about this technique on Lindly Haunani's website. Here's a link: Altering Polymer Clay with Inclusions. She discusses a variety of other inclusions, too, so it's a good read if you're new to the idea.

Here are a few things I noticed and/or did when I made my crayon-inclusion beads:
  • As Lindly points out, some of the colors can be unpredictable. They may not come out of the oven exactly the same as they went in. Some intensify; others seem to fade. This isn't a problem if you're just having fun, but if you require specific results, you'll want to bake some test chips.
  • I used very cheap "off-brand" crayons bought on sale. They're pretty worthless as crayons-- very poor performance in coloring books, etc.-- but they still make good inclusions. So if you have a box of poor quality crayons, you might consider trying this technique with them.
  • I took shavings from the crayons, then chopped those into small bits before mixing into the clay. I then used a craft knife to further chop any larger pieces of crayon in the clay mix. It's not always necessary to chop the crayons that much, but it is the look I prefer. However, all that chopping can be time-consuming and tedious. I don't know how well a food processor would work with crayons (seems a bit messy), but it's an idea, if you need a lot of crayon chopped finely.
  • I added some embossing powder into my mix for a different look. The beads in the photo above have seafoam white embossing powder as an inclusion in addition to the crayon shavings.
  • Maybe it was just a lucky chance-- a good batch of clay, cool/dry weather, a fortuitous alignment of the stars ;o)-- but it seemed to me that these mixes of clay were slower to take fingerprints than regular ("inclusionless") clay. Adding certain inclusions (especially powders) does seem to "dry" the clay out a little, which makes it easier to avoid fingerprints-- and the slightly uneven surface resulting from these types of inclusions may make it less obvious if there are prints.
If you haven't tried combining crayons with clay, maybe now's the time. Those tantalizing boxes of color are perfect for getting you in the mood for the approaching summer-- and you probably have everything you need already on hand.