Showing posts with label glitter. Show all posts

Friday, January 04, 2008

Studio Friday: Brand New!

I haven't participated in Studio Friday for a while, but this time I thought about it in time (and had time to respond). :o)

The topic for this week was as follows:
A new year!!! Exciting! All new things, experiences, flavours, people and things are waiting for you to be met and greeted.How about your studio and creative space? Are there any brand new items, materials, colours, paints, papers, wooden logs, clay, journals... waiting for you to be unwrapped or unpacked?? Maybe there is a new project or idea waiting to be polished and executed? Or you may have set a new goal for yourself or a resolution?

Ah, new supplies! A subject so very dear to my heart!! ;o)

Because I have the unfortunate combination of a slight addiction to art supplies and a hesitation to actually use most of them (for the first time), I actually have a quite a few things waiting to be unwrapped-- or used. But for this post, I'll focus mainly on the things that are new since Christmas.
Here's a photo of some (but not all, if you can believe it) of my craft-related gifts this year:


In case you can't see everything: new packages of polymer clay (You can never have enough!), eyelets, three colors of embossing powder, little shape cutters, a texture sheet, Amazing Mold Putty, blue-toned confetti-style glitter, and a watch (of the type that you make your own wristbands for). :o)

I'm going to have fun with all this! With the exception of the watch, everything there was on my pc-related wish list this year. And I could use some pc with that, too, if I really wanted to, by using polymer clay beads. (g) This'll be a good opportunity to use some of my stash of storebought beads, though. :o)

I'm excited to try everything in the photo. (In fact, I've already tried the embossing powders!) I'm holding back on the mold-making putty-- want to make sure I use it on something that's "worth" it-- but I'm really looking forward to using that, too.

I bought the confetti glitter for myelf, with a coupon. I thought it looked a lot like the colored Arnold Grummer flakes. I have plenty of the regular/clear iridescent flakes-- though not the AG brand-- but I haven't seen any colored ones around here before, so I was happy to find them. If only they'd had mint green. . . But the blue is gorgeous, too. I'm going to give Donna Kato's liquid-based faux opals another try, one of these days, and these beauties will come in handy then!

I just remembered that when I took the photo I forgot to include the lovely "queue" of rose petal-themed fluid chalk inks I received (Clearsnap brand, I think). They're wonderful colors. I have no excuse not to try some of the inked beads in Donna Kato's book, now. ;o)

In addition to the clay-related supplies, I now (since the great day after Thanksgiving sale at JoAnn Fabrics) have a stock of pretty flannels that I need to use. I'm venturing into the world of sewing/quilting, starting with flannel rag quilts. I've already made one rag-quilt-style bag and started on a flannel and denim rag quilt, but I have many more projects lined up-- and plenty of flannel to keep me busy for quite a while!

Here's a photo of some of my favorite prints:


Such happy, pretty colors! I love the colors in the polka dot fabric, and the floral print reminds me of the illustrations in William Steig's The Amazing Bone (which I used to read to my youngest sister). It makes me happy just looking at it. :o)

So I have plenty of new supplies to kick off the new year creatively! Now it's just a matter of deciding what to do with them all! :o)

ETA: Sorry about the disappearing photos. I don't know what happened. I guess Blogger ate them, somehow. Hope these copies stay in place for a while! (g)


Tuesday, July 31, 2007

Top Ten Tuesday: top ten products to add to mokume gane

I've taken it into my polymer-crazed head to post a weekly feature here called "Top Ten Tuesday". (We'll see how long this lasts. . . (g)) Every Tuesday, I'll focus on a different clay-related topic. Since this is the inaugural list, I thought I'd go easy on myself and choose an easy one. ;o)

Top Ten Products to Add to Mokume Gane (and Why):

10. Nothing
No, seriously. You can get some gorgeous mokume gane effects with nothing but polymer clay. Try mg with your own special mixes of mica clay and translucent, clay, too. This style of mg looks best, imho, when patterned with deeply-etched stamps. Check out some of what Nan Roche has done with this technique, if you're seeking some mg inspiration.

9. Glitter
If you're a sucker for that glitzy glittered look, why not sprinkle a little into your next batch of mg? There are a couple of ways you can apply it. Sprinkle it over a sheet of translucent clay, if you want just a little. (Putting too much will prevent the sheets of clay from adhering properly.) If you want more, use the glitter as an inclusion in some translucent clay, then roll that into a sheet for the mg block. Very fine glitter will work better than larger-scale glitter, and polyester or glass glitters perform best during the curing process. (Metal glitters can distort in the heat, with unattractive results.) You could also try a thin application of glitter paint on translucent clay.

8. Metallic Foil

Mylar-backed metallic foils (as opposed to real metal leaf) can be used with mokume gane. One example of this material is the line produced by Jones Tones. To use metallic foil in mg, just burnish it onto a sheet of translucent clay, pull off the clear backing, and use either as is or after crackling the foil by feeding the sheet through the pasta machine. Metallic foil comes in a variety of colors, patterns, and "effects" (such as oil slick, rainbow, etc.), so there are lots of possibilities with this product. (The downside is that some foils can be difficult to apply to clay.)

7. Lumiere Metallic Paints
Lumiere
paints (from Jacquard) come in a gorgeous array of metallic colors that can be mixed to create still more colors. This paint tends to stretch with the clay-- not crackle. There are two ways to approach this property. First, you can embrace it and not worry about crackling. However, if you've got your heart set on crazing, you can dilute Lumiere paint with water-- up to a 1:1 ratio. The addition of the water improves the "cracklability" of the paint. Apply a thin coat of paint to a sheet of translucent clay. Once it's dried, feed this through the pasta machine or roll it with an acrylic rod to create crackle (or not, depending on the look you want).


6. Posh Metallic Inkabilities
Ranger's Posh Metallic Inkabilities come in two sets. Luminous Metallics (the one I own) contains a rainbow of six colorful metallic inks (blue, pink, teal, violet, green, and red), while the Precious Metals set comes with six "metal colors" (silver, copper, charcoal, rich gold, white pearl, and bronze). These inks come in .25 ounce needlepoint applicators and were originally designed for use with stamping, but they work great with polymer clay, too. Gorgeous metallic colors-- and they crackle, too. Just drop a tiny bit onto your sheet of translucent clay, spread it around with a brush, let it dry, and crackle away.

5. Mica Powders

Mica powders, such as Jacquard's Pearl-Ex line, are popular with polymer clay artists, because they have a number of applications. There are a couple of ways to apply them to mokume gane, as well. First, you can put little dabs of them here and there over a sheet of (painted or unpainted) polymer clay. (Be careful not to put too much, as this will prevent the sheets of clay from adhering to one another.) Another way to incorporate these sparkling colors into mokume gane is to mix them with an acrylic base of some sort. Future Floor Finish works well. Just mix a bit of powder into a few drops of Future until you get a nice paint-like consistency. Apply and crackle (or not, as you like).

4. Metallic Acrylic Paints
A number of brands of acrylic paint include metallic and iridescent colors in their lines. By all means, try what you already have, but if you're still building your stock of art supplies, be aware that you don't have to spend a great deal of money on metallic paints. Every brand behaves a bit differently-- and often there are variations within a brand, from color to color-- but often the cheaper "craft paints" work just as well, if not better than, the more expensive artist-grade paint, when it comes to crackling. My personal stock includes some FolkArt Metallics (from Plaid), some Dazzling Metallics (from DecoArt), and a couple of Anita's Metallics. All will work with polymer clay mokume gane. You'll have to experiment to see which crackle best to your liking, but even those that don't crackle as well can still be very pretty in mokume gane (as well as in other polymer clay applications, such as antiquing and dry-brushing).

3. Alcohol Inks

For a dash of transparent color, you needn't look further than alcohol inks. Alcohol inks have a number of uses with polymer clay, and at least a few of them apply to mokume gane. Jacquard's Pinata Colors come in 17 bold colors, while Ranger's Adirondack Alcohol Inks are available in 24 more subtle, earthy tones. Both lines are beautiful and can be used interchangeably. Here are just a few ways to use them with mg (and you can probably come up with more): First, drop a bit on a sheet of translucent clay and use a brush to cover the whole surface. (You can use straight ink for darker color or dilute it with alcohol or extender for a watercolor effect.) You'll be able to see through this layer of color, in the finished pieces. Second, drop the inks onto metal leaf in order to colorize it. Leave the drops as spatters of color or blend them over the whole surface. You'll be able to see through the color to the metallic sparkle of the leaf. Third, apply a drop or two to some polymer clay. When the ink is dry (after 15 - 30 minutes), condition the clay until the color is distributed through it (either evenly or in a marbled pattern, as you wish). Use this clay as a sheet in your mg stack. It will be colored, but still somewhat translucent.

2. Daler-Rowney Pearlescent Liquid Acrylic Inks
Pearlescent Liquid Acrylic Inks (from Daler-Rowney) are a favorite product of many people, including artist Allison Ingham, who uses them to achieve attractive crazing in her polymer clay work. They come in a range of lovely colors, go on smoothly, and crackle beautifully. I've read that the best way to apply them for optimum crackle is to not shake the bottle, but to drag up the thicker "dregs" from the bottom of the bottle and paint with those. Personally, I do shake the bottle and just dip from the top, and I've been happy with the results I've gotten. Try both methods and see which you prefer.

1. Metal Leaf
It's the classic mokume gane addition, and for a very good reason: combined with delicately tinted translucent clay, it creates an absolutely gorgeous effect. Metal leaf adheres easily to polymer clay and crackles easily. The gossamer shimmer of crackled sheets of real metal-- it's the ultimate draw for those of us with inner magpies. Lindley Haunani is credited with pioneering this style of mg. For a slightly different look, apply metal leaft to sheets of untinted translucent clay. Slices from the mg loaf can then be applied to base clay in any color(s) you want. In this ways, you can make mg beads, pens, etc. in a variety of colors, all from one batch.


The Final Word on MG-Related Products:

Whatever you put in your mokume gane, whether you like to "mix it up" and put a little bit of everything in there or your style is more restrained and classic, don't be afraid to try something new. There's no telling what we'll be adding to mokume gane five or ten years from now, and maybe you'll be the one who discovers the next great product!


Sunday, July 29, 2007

Kato's "New Opal"

It's high time for another post. Let's see. . . what can I post about?

Well, here's something:
I tried Donna Kato's "new opal" last week. I've made the opal sheet, but so far haven't done anything with it, beyond cutting it. The results were somewhat disappointing. Oh, it looked ok, I guess, but it was much more brittle than I'd expected.

First, I had a little trouble getting it off the tile. It wanted to crack apart, until I slid a tissue blade underneath to gently pry it up until I could get a good grip on it. Then, when I tried to cut it, the brittleness/crumbliness made things difficult, too.

It's hard to tell much for certain from photos, but the pictures in the tutorial-- and the fact that in her gallery, she's used this faux opal sheet to cover a slightly curved cabochon shape-- look to me like hers were more rubbery and/or flexible than mine turned out.

I can think of a couple of possible reasons for this, right off-- and there may be even more.

First-- I wasn't using the same type of flakes used in the tutorial. I suppose this might have affected my results in more than just appearance. I have yet another brand of flakes (still not the one used in the tutorial, though) that I can try next time, to see if this makes a difference.

Second-- I wonder if I didn't make my sheet thin enough and/or get my mix right. Too many flakes, not enough liquid clay. Ms. Kato describes the correct consistency as being like oatmeal. Unfortunately (in this one instance, at least), I'm not much of an oatmeal eater, so this was a bit of a guessing game for me. ;o)

The tutorial indicates putting the cured and cut opal sheet on top of a base of regular clay. In this step, you have to choose your clay color with care, because some of the base shows through. Well, with my sheet, you can put it on whatever you like, 'cause ain't nothin' gonna show through that sucker. (To put it elegantly. (g)) This is probably another indication that my proportions weren't right and I didn't smoosh it down thinly enough.

All in all, rather disappointing, though I can still try to use the pieces did manage to cut out. I just was expecting to have so much more control over the shapes I could cut from it. (That was one of the reasons I was so excited by this technique.) I suppose one mustn't expect success on the first try with every technique, and once I get this one "down", I have a few twists I want to put on it.

__________________________

Random bit of nothing:
I daren't be explicit, for fear of inciting "flames". . . and of becoming some milder form of a pariah (though, honestly, some days I already feel like one, in some of these silly groups!). . . but I need a vent for my annoyance, even if it's just a muffled, ambiguous little rant on my own personal blog.

So-- You know how "a little knowledge is a dangerous thing"? Well, "a little knowledge" has got nothing on "a (very) little power". And. . . I think that's all I'll dare to write here, after all. I'm moving the rest of what I was going to say to an even less public place than this 'umble 'ittle blog. ;o)

Wednesday, July 18, 2007

Pullin' out the ol' electric buffer. . .

I haven't used my electric buffer (a bench grinder fitted with buffing wheels) for quite some time. (One of the major benefits of making miniature food is that you don't really have to sand or buff that much.) So when I set it up and switched it on again, I had to remind myself how things worked. I was a little nervous. It didn't take long to get back into the groove, but even "the groove" isn't very groovy, when it comes to buffing. ;o) I love the incredibly glass-like shine you can only get by "power-buffing"-- and I like doing a piece now and then just for the fun of seeing the shine pop up-- but I wouldn't mind passing off the bulk of my sanding and buffing to someone else!

So, now that I've gotten the whining out of the way. . . ;o) . . .you may be wondering what I was buffing.

I started working my way through a small pile of mokume gane beads. I've had these things sitting around for I-don't-know-how-long. I know it's been over a month, maybe two. (They were probably sitting on my clay table for a month before I even got around to curing them!) I used a ripple blade a lot in this batch, as you can see from the rippling pattern in some of them. . . What else? I'm pretty sure this batch didn't have any leaf in it-- just various types of paints. The golden-green must be Dazzling Metallics-- Festive Green-- because I got that as a gift back at Christmas, and I wanted to try it out. As for the other paints, I don't remember which I used. Probably Blue Topaz from the FolkArt line of metallic craft paints. . . and a blue-green from Posh Impressions' Luminous Metallic Inkabilities. Oh, and some of my trusty four-colors-a-dollar glitter. (g)


Some turned out better than others, as usual with mokume gane. Maybe the colors were a bit too similar for maximum impact, but I do tend to like monochromatic and limited color schemes.

I also buffed a few "shell-shaped" beads I made a few weeks ago. Well, I call them "shell-shaped". A couple of them are nautilus-shaped pendants (with the wire bit taken out for the sanding and buffing stage), but the first one just makes me think of spiral seashells.

This is my first attempt at a bead shape I admired in Making Polymer Clay Beads. It's pretty simple to get this shape-- just make a snake that's relatively "fat" in the middle and "skinny" at both ends, then wind it around a skewer or rod to shape it. My technique still needs some work, but I had fun playing around. I used scrap clay-- a mostly opaque pale blue with flecks of aluminum leaf in it and a mostly translucent aqua with lots of glitter in it. (Aqua is one of my favorite colors, these days. It's perfect for summertime, I think, and a fitting color for sea-themed pieces.)


Next, here's one of the nautilus-shaped pendants. Again, I used the aqua-translucent clay with glitter, this time paired with a Skinner blend that goes from aqua to more of a periwinkle blue.


One last photo-- another nautilus pendant. This time, I used the same Skinner blend from above, but I switched the glittered clay out for pearl.


Incidentally, I think this was the first time I made a Skinner blend that I was actually happy with. I think I've only tried it once-- maybe twice-- before. (I know, it's shocking. How can someone have used clay for a couple of years without blending?!) Now that I know how to do it, I'm going to have to give it another try. I'm thinking of peachy-orange and pink-- or sunset pink and purple. . . more beachy colors for seashells. :o)

PolymerCAFÉ -- the summer issue

The latest issue of Polymer Cafe arrived over the weekend, and of course it's been "gone through" several times, by now.

Here are a few things that caught my eye:

Page 10-- the Ranger ad regarding the use of embossing powder with polymer clay. (I have to admit, I like looking at the ads in this particular magazine almost as much as the content, sometimes! As I've said before, I "suffer" from a severe craft supply addiction.) I've been interested in trying out embossing powders with clay for a while, and this ad just puts more fuel on the fire! Clever trick, too, the way they force you to go to their website to find out whether the powders are on or in the clay. (g) I penned in the "answers" in my copy, for future reference.

* * * * *

Inside the front cover-- the ad for Liquid Fimo. It showcases a jewelry design by Karen and Ann Mitchell (the authors of the liquid clay "Bible") and gives the basics on how to achieve similar results. It sounds pretty simple-- just mix the liquid clay with a couple colors of glitter (separately), then spread the tinted clay on a bakeable surface, marble it, bake it, and cut it with paper punches. (You could also use scissors or a craft knife, I'm sure, but if you have the punches, they'd make it even easier.) It's very glitzy, and there's no way I'd ever wear this much glittery stuff all at once-- but scaled down a bit. . . quite pretty! Another thing to keep in mind when I'm playing with the liquid stuff. . .

* * * * *

Page 13-- a clay tip from Dotty McMillan, explaining how she uses eyelets "to enhance those special beads". Fun idea-- especially for bright, playful beads. Wouldn't look right with much of what I'm currently doing, but still something to remember.

* * * * *

Pages 44-47-- Lapel Pin Vase. I'm not really the type to wear a lapel pin vase-- wouldn't like right with my casual tops and jeans!-- but I do like the look of it, and this technique can be applied to anything, really-- especially something flat. It's not that different from some things I've tried before, except for the use of the metal leafing pen instead of actual metal leaf. I'm definitely putting this on my "try it soon" list. (More liquid clay projects!)

* * * * *

Page 48-- "Beaded Extruded Cane Bracelet and Earrings", by Francie Owens. That bracelet is so cute! I love the colors, too. (And it uses an extruded cane-- something I've been wanting to try, now that I have one of those homemade "leverage" thingies to use with the extruder.) I can't really see myself learning the bead weaving part right now-- no time to learn yet another hobby-- but this is one of the few times I've ever felt interested in bead weaving, so good job, Ms. Owens. ;o)

* * * * *

Page 51-- "In Search of the Perfect Mica Shift", by Velina A. Glass. This is an interesting approach to mica shift. It eliminates the need for making a careful cut to achieve the mica shift effect. Ms. Glass refers back to an article by Arlene Schiek, published in a previous issue of PolymerCAFÉ (Fall 2006, if you're interested). However, she changes something from Ms. Schiek's technique, so it's a bit different. The benefit of this technique-- no persnickety shaving with a tissue blade. Particularly helpful for people who have difficulty making a nice, even slice, or for someone who hates handling those sharp blades. The drawback-- you have to do more sanding. It's definitely a matter of choosing the lesser of two evils. You just have to decide which thing you hate worse, shaving or sanding. (g)

Friday, May 04, 2007

A mini feast (for the eyes) ;o)

I'm definitely in a "mini phase"-- meaning, not a phase of short duration, but a phase in which I'm obsessed with miniatures. (g) I'm sure I'll eventually move on-- or back-- to something else, but for now, I'm revelling in the minis!

So-- some of what I've been doing lately:
I've made two types of "sunny-side-up" fried eggs--
One more fragile type for post-back earrings:
And one sturdier type for "dangly" earrings:
I made some non-jewelry mini biscotti (dipped in chocolate) for the same great lady who suggested that I make Pop-Tarts:

Then I finally got around to making the ice cream sandwiches I've been thinking about for a while. (I haven't had an ice cream sandwich in a long time, but making these made me hungry for one!)


I think I made the waffle before I made the ice cream sandwiches, actually... So far, I've only made one. Next time, I think I'll make the pat of butter a bit less translucent-- but in some ways, I like it like this... I want to make pancakes, too, but when I played around with it the first time, I wasn't happy with the results. I think I have a better idea, now. Who would think that a pancake would be harder to do than a waffle?! (Well, in clay, I mean.)

My last "big" experiment was a mini hamburger. It took me a while to make-- partially because I was figuring it out as I went along, but also because there are so many components to a burger, compared to most of the other minis I've made.

There are things I can do to improve the realism of this piece-- with the lettuce and tomato, in particular-- but if you're making things to sell, you can only put so much time and work into something before you have to charge more than anyone's willing to pay for a "cute little pendant".

Anyway, for a first try, I was pretty pleased with my mini burger, if I do say so myself! ;o) Now I'm looking forward to trying it again-- maybe a double cheese burger next time-- and I also have some ideas for hot dogs... :o)


And of course I'm still making a cupcake now and then:


I've been working on "glittery" cupcakes, with glittered icing. I like the looks of glitter, but it's such a pain to work with-- especially at the clay table. If you don't clean up every little speck of it (which is, let's face it, nearly impossible to do), you'll be finding glitter in your clay where you didn't want it. (You can do the glitter work away from the table, but if you aren't careful, you'll still end up bringing it back to the clay, on your hands.) The other thing I hate about glitter is how hard it is to get it stick well enough to the clay that it won't just brush off later-- and getting it thick enough. You almost have to seal it (meanwhile being very careful not to contaminate your sealant bottle with glitter, in the process) and apply it in multiple layers.

Ugh! Glitter!! I'll be happy when the glitter cupcakes are done! (g)

Fortunately, not many mini foods require glitter. ;o)

Tuesday, February 20, 2007

Mokume gane tutorial up and running!

My DH, Donald, has uploaded the latest tutorial to our clay website. The tutorial is for one version of the mokume gane technique. I call it "This 'n That Mokume Gane", because it uses a little of this and a little of that-- just whatever you have on hand, really. It's one of my favorite techniques. I think the results can be stunning-- certainly a whole new look for those who are more familiar with polymer clay techniques that don't involve lots of translucent clay.

Here are a few beads made with the batch of MG I created for the tutorial:


Now I need to start thinking about what to do for the next tutorial... ;o) Oh, and write about tons of other things for the "techniques" section of the webpage!

Monday, February 05, 2007

Silver-tone mokume gane, take 2...

I went ahead and used up the rest of the silver-tone mokume gane block. (I'm trying to finish projects before starting new ones. True, there are glittered, tinted translucent clay mixes sitting around, remnants from my opal obsession, and other items of evidence to the contrary, but from here on out, I'm trying to do better.)

Since I wasn't quite thrilled with the results from my first experiments, I decided to try something a little bit different.

For instance, here's a red base bead (metallic red, I think-- since I already had some custom-mixed) rolled in as thick a covering of chunky red glitter as I could get to adhere to the bead. Then, of course, covered in slices of the silver mg. I think it turned out better than the first batch. It's at least more interesting to look at, IMO.

The piece below is a pink/peach base bead with (if I remember correctly) iridescent "confetti" glitter (the type you use to make opals) between the base clay and the mg slices. It turned out ok, but I don't think the iridescent glitter showed up much.

One more example from the new batch of silver-tone mg: It's a green base bead covered with chunky green glitter (same brand as I used for the red glittered one above).

I think I prefer the ones with glittered base beads to the other type, with this particular mokume gane block.


Tuesday, January 30, 2007

Silver-tone mokume gane

I'd been wanting to make a silver-tone block of mokume gane for a while-- before I came down with the cold. I finally got around to starting it over the weekend, and yesterday I managed to buff up the first batch of beads I made from it. (There's still at least half of it left, unsliced.)


I'm sorry to say that I was a bit disappointed with the results. It's not that they were ugly, but they just didn't have much "pop" to them. Instead of being silver-tone, they're more grey-scale! (g)


Here are a couple of them:


There are a few more photos of this batch up at my Flickr page. (The link's in the column at the right of this page.)

I think part of the problem is that some of the silver (paints and things) turned out to be less silver than grey. Again, they aren't bad... I think part of the problem is that I'd been thinking so long about doing this particular color combination (if I may call such a monochromatic design a "color combo" (g)) that I expected it to "wow" me more than it did.

Well, I have a couple of ideas of different things to try with the rest of the MG block, now that I know I don't care to repeat those results. One thing I want to try is putting the MG over a very heavily glittered bead-- something with the big, chunky glitters I got at Dollar Tree a long time ago. (I tried one with the small holographic glitters in this batch, and while it was ok, I think the chunkier glitter will make a better effect.)


Wednesday, January 17, 2007

Key chains with photo transfers

Oh, forgot to mention in my last post that I uploaded a few photos to my Flickr account this afternoon. Not many, but a few.

Among them were some key chains with photo transfers-- made as "a little something extra" to go in with the Christmas gifts for a few pet-loving family members. While I'm happy that the photo transfer process I'm using seems to work pretty well, I'm less than satisfied with the overall project. I'm just not that great at putting together different elements of clay.

Buy hey, they're just key chains, so they don't have to be perfect!

Here are a couple made with black clay for trim. I added a silver metallic wax rub-on to give a faux metal look, so I "had" to seal them with something (to keep the wax from rubbing off). I used two or three coats of MinWax Polycrylic, glossy.


For this one, I used very lightly tinted (too lightly tinted, as I realized when I saw the result) translucent clay with glitter inclusions. I also sealed this one, more to protect the photo transfer than anything else. Oh, and the accent bead is a twisted together bit of white and black clay, dusted over with Pearl-Ex powder-- duo yellow-green... or gold-green... or whatever it's called.


I need to think out a better way (or at least a way I'm more satisfied with) of using photo transfers with jewelry and such. (It's the covering up the back of the transfer clay and finishing off the edges nicely that gives me the trouble...) I'd like to try more transfers, but I'm not sure yet what all I want to do with them! (g)

Thursday, January 04, 2007

Galaxy Beads

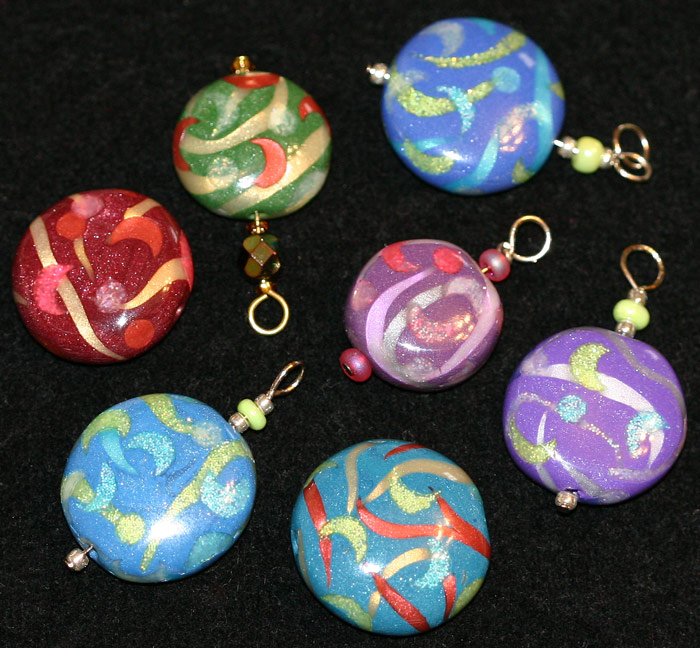
Take a look at my first attempts at the "Galaxy Bead" project in Katherine Duncan Aimone's new(ish) book, Polymer Clay: The Art of Jewelry. (The book was a Christmas gift from my parents. Thanks, Mom and Dad!) The photo quality's not much, but it'll have to do for now. It's too dark to take a decent photo (since I normally use natural light). At least you can get the basic impression:


The project was contributed by Jennifer Bezingue. I didn't recognize the name, but the beads (and another, similarly styled project she contributed to the book) are absolutely gorgeous, I think.

I had fun with the project, though it was a little bit of slow going at first. Even by the last bead I made, they're still rather time-consuming beads to make. I'm sure I could crank them out faster by pre-cutting the appliques, but I like to see what I need for each bead as I go. Besides, I don't really need to crank them out.

One thing I had a little trouble with-- in the book, many of the appliques are these darling little stars-- far, far smaller than the smallest star-shaped cutter I have (the Makin's Clay brand of cutters). I ended up using mostly the hand-cut swirls and drinking straws to cut circles and crescent moons. I think the moons turned out pretty well, but I really loved the look of the stars, so I'm putting that on my "Maybe Someday" wish list, assuming I can ever even find a place that sells such tiny shape cutters. Art stores on-line probably do...

So, anyway, fun project, beautiful beads. I'm looking forward to trying it again, maybe with a few twists on the basic idea next time.

Fabulous Faux Opals

I love the look of opals, so I was very excited when I learned that it's possible to make faux opals from polymer clay.

(Actually, faux opals were one of my very first projects with clay-- maybe even the very first. The imitative techniques were that convinced me that this polymer clay stuff might be fun to play around with. I loved the faux opals, mother of pearl, abalone, jade-- and so many others, too!)

There's an old legend that opals are bad luck. Some versions of the legend say they're bad for everyone, others say they're just bad luck for those who don't have the opal as their birthstone. (But I have heard that you can get around this if someone gives you the opal as a gift. Buying an opal for yourself is a no-no. ) However, I haven't seen anything about getting bad luck by wearing a faux opal. ;o)

While I'm not a particularly strong believer in most legends of this type, I am somewhat deterred by the price of some real opals. ;o) Plus, it's nice to be able to make "opals" in whatever size and shape you like. It's also fun to tell people who admire the "opal" that you made it yourself-- from clay, of all things! (Of course, they may not believe you...)

I've read about numerous techniques for imitating opals-- some in books, some on-line. My favorite opal recipe from a book can be found in Irene Dean Semanchuk's beautiful Faux Surfaces in Polymer Clay, which I highly recommend to anyone interested in imitative techniques. For free (yay!) on-line tutorials, my favorite two (by other people) are Linda Geer's and Barbara Reider's versions.

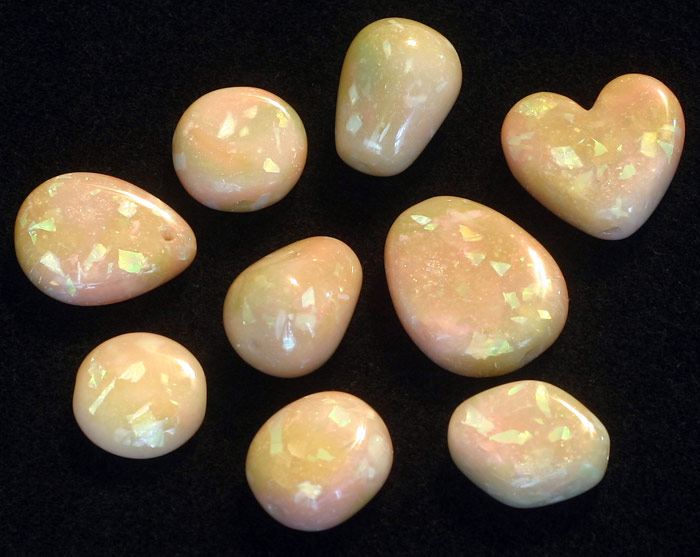
After playing around with everything I was able to find about faux opals and tweaking things according to my tastes (and what I had in my supply cabinet), I put my own version of the technique in an on-line tutorial, which you can find here at Polymer Clay Web.

Here's a photo of some of the faux stones I've made with this technique:

Of course, with something like this, with all the translucency and layers of glitter, it looks better in person than in any photograph. I love the way the "fire" in even faux opals shifts as you turn them in your hand.

As you can probably tell from the photo, I'm especially fond of the pinkish/yellow-green-tinted opals, but you can make them in any color you like. I've made them with cotton candy pink and blue, peach, and other colors, too.