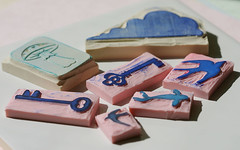
I once thought carving stamps would be difficult, but it's actually very do-able. (Not to say that I'm now an expert, but I've been able to carve stamps that I'm happy to use.) It's also quite a bit of fun!
Here are a few quick pointers:
- Invest in the right tools. (This is especially true if you think you'll want to be carving on a regular basis.) As with so many other things, having the correct tools makes stamp-carving much more enjoyable. Some people can carve detailed stamps with nothing more than a craft knife, but most of us have better control with linoleum cutters. (You can also use them to carve cured polymer clay!)
- Remember: 1) It is recommended that you carve with the sharp end pointed away from you. 2) Go slowly. It's easy to go back and remove more later, but if you carve too much, the damage is done. 3) Most people prefer moving the material that's being carved rather than moving the carving tool. Hold the tool more or less "still" and maneuver the carving block underneath it.
- Keep the sharp tools away from kids and pets. This probably isn't the best craft for kids. Unless they're old enough to chop vegetables and peel fruit, they probably shouldn't be trusted with linoleum cutters. However, you could always let the kids draw the design, then have an adult carve it for them.
- Find a quality carving material. There are a variety of products out there made especially for carving-- as well as erasers, which can also be carved-- but they're not all created equal. I've only tried a couple, so far. Speedy-Cut (which is a pale cream/beige) carves very easily, but it is crumbly, which means that your finished stamps will also be prone to crumbling. After you put all that time into making a stamp, you probably want it to last, so it's worth paying a little more for something better. I've just started working with Speedy-Stamp ("the pink stuff"), which has a better reputation than Speedy-Cut. So far, it does seem better. Maybe a tiny bit firmer, but still pretty soft-- and much less crumbly.
- Set reasonable expectations. As a beginner, it's best if you don't start out with a huge, complicated pattern. Instead, let a simple shape be your first project, then go from there. If you like a slightly "rough-hewn", rustic, even "primitive" style, you'll probably love this craft immediately. If you want detailed stamps with smooth, thin lines, you'll need more patience (and practice).
- Geninne Zlatkis' Tutorial
- Stamp Carving Tutorials from Atlas Quest (a letterboxing resource, but good for any stamp carver)
- Thread on Craftster
- Speedball Tutorial (how to use photos as stamp patterns)

5 comments:
Great Post Michael! Although I haven't used the speedy-cut or the speedy-stamp I have carved sheets of Lino for block printing and as texture plates for polymer clay. With the stiffer linoleum it is easier to cut when it is warm, so I sit it on the heater or warm it with my heat gun before carving. I would like to try the speedy-stamp though, it looks like it would stamp a lot better than the lino!
Thanks, Cindy!
I've never cut lino, but I've wondered about it. Maybe someday. :o)
Is it okay to mention my book on rubber stamp carving? http://www.amazon.com/Weekend-Crafter-Carving-Techniques-Projects/dp/1579903002
You did a great job of explaining the basics! :^)
as ever,
Luann
i'm just understanding why you came at CASA, sorry i've made my "How to" about stamp become private.
But if someone wants it, just ask and say thank you! ;-))
bye bye
see you at CASA
this is a bit serendipitous ... I just stumbled on your blog tonight and just learned (2 days ago) about letterboxing - my husband and daughter have just carved their very first stamps and have their first "hunt" planned ... thanks for the stamp carving links - I know they'll come in handy. :) ~M~
Post a Comment